
We will have owned this house for 2 years (in Oct. '15) and have accepted an offer on it this week! I'm actually more sad to see it go than I thought I would be, b/c I never loved it. It was't my mid-century style and never could be, but it still had good bones and cleaned up really nicely. The house had a frenzy of showings when it hit the market last week and got a total of 3 offers (one offer which eventually walked, one offer was wayyy too low, and the perfect 3rd offer which we accepted yesterday!).
Here we go!
Welcome to our home:


Walking inside, here is the foyer. Such a small space, but one of my favorite 'Afters.'

This is the view you get walking in from the entryway:


Next up, the dining room:

Also, all of my window treatments are super cheap. Rods from Walmart and white curtains from IKEA, hemmed to length. I love my frugality :) But also how crisp and clean they look.
Let's move into the Kitchen:

First off, we removed the door leading to the garage on that wall in the right of the picture (behind chandelier) and moved the garage access to the mudroom, where it belongs. Just by closing off the door, the kitchen felt 1000x more home-y. No longer was I looking into the window-pane door to the junk in our garage! I then decided to also plank that wall to give it some visual interest since it's painted white (I'm obsessed with neutral paint right now but using textures instead to give the rooms some interest). Also, a HUGE update was changing out the florescent light to 3 new recessed lights (on a dimmer switch!). It gave the kitchen such a different feeling and WARMTH! I am obsessed with the recessed lighting! Props to Ross for becoming a self-taught electrician these past few years! And with the help of one of his more experienced friends who helped us wire up the 4-way switch.

Ross & I also finished the crown moulding in the kitchen (a feat I'm really proud of us for. Cutting all those angles was quite the learning curve, but now we're pros!). Ross also finished putting up new baseboards and quarter round. All of those finishing touches really brought the kitchen up to the 21st-century without breaking the bank!
Moving on....
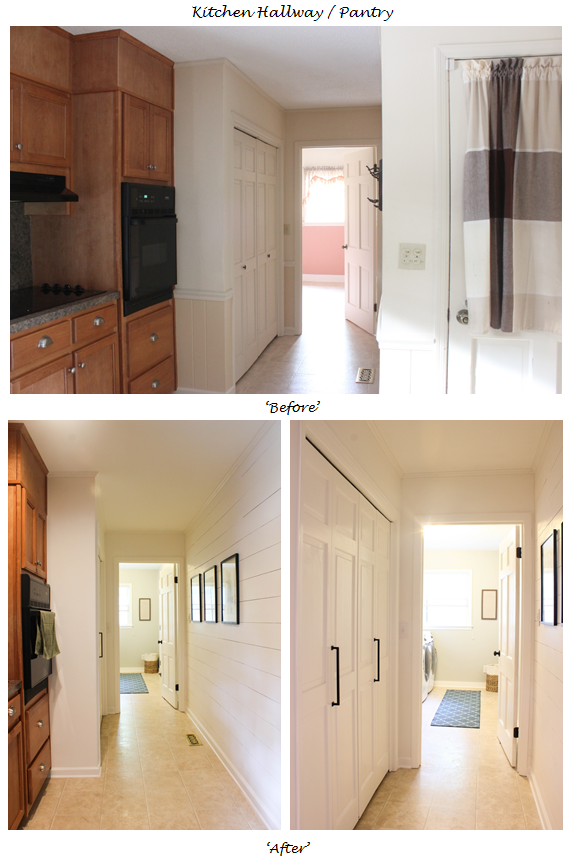
This is our pantry, that leads into the mudroom, and leads out to the newly installed door to the garage. I'm obsessed with our pantry. It's huge!! It was the old washer/dryer location that we converted into shelving, with the same vinyl flooring from the entryway. I also love the hardware I installed on the bi-fold doors, they reflect nicely off of the black photo frames in that hallway. I sadly put a LOT of obsessive thought into these tiny details :/ But pretty hardware makes this girl happy :)
In the photos above, the wall on the right of the pic was actually the first plank wall I decided to do about a year ago when Ross was out-of-town one weekend. I didn't tell him what I was up to but it was fun playing with his miter saw and nailgun :) He wasn't sure if he liked it at first, but over time, is really happy with it. And I am absolutely obsessed (hence the 2 additional plank walls down the road)! I also get a lot of compliments on it so it's makes me blush and love them even more :)
Next up...


Ok, I lied about the kitchen... the mudroom was DEFINITELY the biggest under-taking. We hired out a plumber back when we bought the house to move the washer/dryer connection from our pantry to this new location. We had no clue what the purpose of this room was previously, but to us, it made sense to turn it into a mudroom/laundry room. This is also where we installed a new (fire-rated) door to the garage. I came up with the layout, w/ a lot of pinterest inspiration! I needed to make sure I made good use of every inch of space in this tiny room and I think I succeeded! I love this room! The cabinet was from walmart.com and we built around it. Ross made me the built-in bench. I just love how the room serves so many functional purposes!! We also hired an electrician when we bought the house to update the breaker box, a much needed update to this house and well worth it.
That's it for today! The post is already too long, so stay tuned for 'Part 2' of the Before & Afters!
*Kristin*
No comments:
Post a Comment